Recipe · Artisan Breads
Fresh Milled Sourdough Focaccia
By: Eleen Beisner
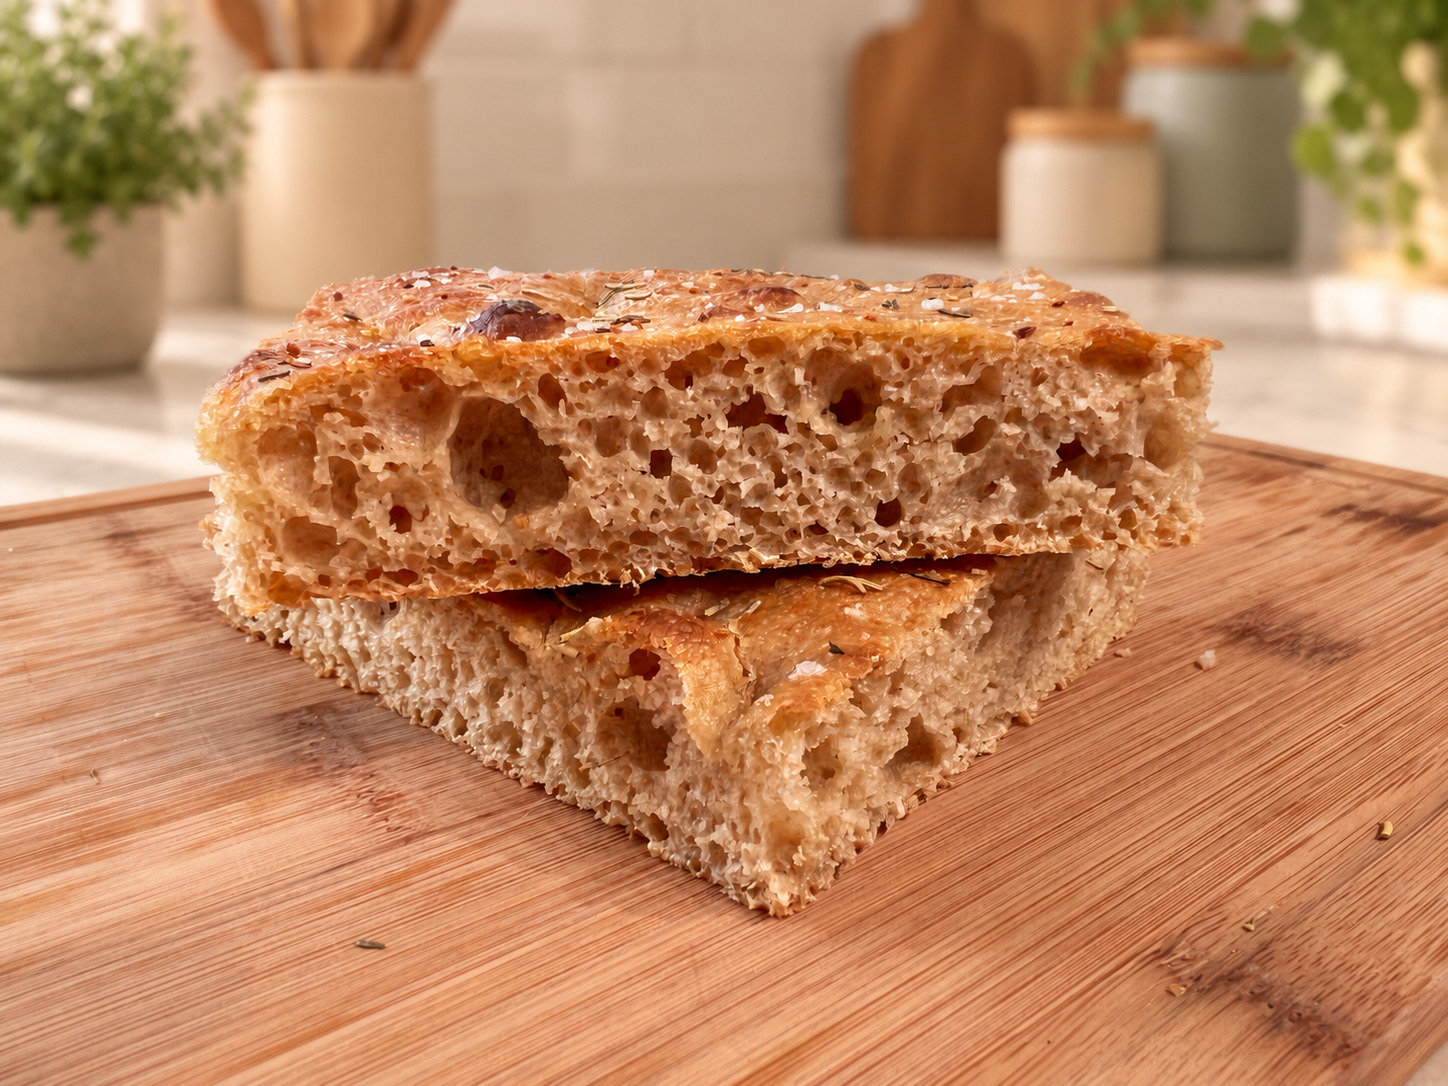
This fresh milled sourdough focaccia has a crisp, olive-oil-coated crust and a soft, airy crumb. The overnight cold ferment builds flavor while making the timing easier to manage. Baked in a 13 × 18-inch half-sheet pan, it is perfect for sandwiches, dipping, or serving alongside dinner.
Prep time: About 6½–12 hours (includes room-temperature rests and rises; excludes cold ferment) · Overnight ferment: 8–16 hours in the refrigerator · Bake time: 24–29 minutes · Yields: One 13 × 18-inch focaccia (24 servings)
Ingredients
For the Dough
- 615 grams fresh milled hard white wheat flour, approximately 5⅛ cups
- 155 grams fresh milled spelt flour, approximately 1⅓ cups
- 685 grams room-temperature water, approximately 2¾ cups plus 2 tablespoons, divided
- 115 grams active sourdough starter at 100% hydration, approximately ½ cup
- 18 grams fine sea salt, approximately 1 tablespoon
For the Pan and Topping
- 70 grams extra-virgin olive oil, approximately 5 tablespoons plus 1 teaspoon, divided
- 3 grams dried rosemary, approximately 1 tablespoon, optional
- 3 grams flaky sea salt, approximately 1–1½ teaspoons
Instructions
Hydrate the Fresh Flour
Combine the freshly milled hard white wheat flour, spelt flour, and 650 grams of the water in a large bowl. Mix until all the flour is hydrated and no dry patches remain.
Cover and let the mixture rest for 30–45 minutes. This gives the freshly milled bran time to soften and absorb the water.
Add the Starter and Salt
Add the active sourdough starter, fine sea salt, and remaining 35 grams of water.
Squeeze, fold, and mix the dough until the starter and salt are completely incorporated. The dough should be extremely soft and sticky, but it should not pour like a thin batter.
Strengthen the Dough
Cover and rest the dough for 30 minutes.
Perform one set of stretch-and-folds by lifting one side of the dough, stretching it upward, and folding it toward the center. Turn the bowl and repeat until all four sides have been folded.
Cover and repeat this process twice more at 30-minute intervals, completing three sets total. The dough should gradually become smoother, stronger, and more elastic.
Begin the First Rise
After the final fold, cover the dough and let it rise at room temperature until it has increased by approximately 30–40%.
The dough should look smoother, slightly domed, and visibly aerated, with a few bubbles appearing around the edges. Depending on the strength of your starter and the temperature of your kitchen, this may take approximately 2–5 hours after the final fold.
Do not wait for the dough to double. It will continue fermenting while it cools in the refrigerator.
Refrigerate Overnight
Lightly coat the surface of the dough with approximately 5 grams or 1 teaspoon of the olive oil.
Cover the bowl tightly and refrigerate for 8–16 hours. Use a container with enough room for the dough to continue expanding overnight.
Prepare the Pan
The following day, line a 13 × 18-inch rimmed half-sheet pan with parchment paper if your pan tends to stick.
Pour approximately 40 grams or 3 tablespoons of olive oil into the pan. Spread the oil evenly across the bottom and into the corners.
Transfer the Dough
Remove the dough from the refrigerator and gently release it into the oiled pan.
Fold the top and bottom of the dough toward the center, followed by the two sides, creating a loose rectangle. Carefully turn the dough seam-side down and coat the surface lightly with oil from the pan.
Do not force the cold dough to fill the pan. It will relax and spread as it warms.
Complete the Final Rise
Cover the pan tightly with lightly oiled plastic wrap or an inverted pan that traps moisture without touching the dough.
Let the dough rise at room temperature for approximately 2–4 hours. Begin checking it after 1½ hours. The exact time will depend on your kitchen temperature and how much the dough fermented overnight.
The dough is ready when it has relaxed close to the edges, looks noticeably puffy and bubbly, and jiggles when the pan is gently moved. A light fingertip press should spring back slowly.
Do not wait for the dough to double or rise above the rim of the pan.
Dimple and Add the Toppings
Heat the oven to 425°F.
Drizzle the remaining 25 grams or approximately 2 tablespoons of olive oil over the dough. Coat your fingers with the oil and press deeply into the dough to create dimples.
Gently encourage the dough toward any exposed corners as you dimple it, but avoid stretching or pulling the dough once it is fully puffy.
Sprinkle the surface evenly with the dried rosemary and flaky sea salt.
Bake the Focaccia
Bake for 24–29 minutes, rotating the pan after approximately 18 minutes for even browning.
The focaccia is ready when the top is deeply golden, the edges are crisp, and the underside is browned. The center should register approximately 200–205°F when checked with an instant-read thermometer.
Cool the Focaccia
Carefully transfer the focaccia from the pan to a cooling rack immediately after baking. This keeps the bottom from becoming soft.
Let it cool for at least 20 minutes before slicing.
Baker's Notes
Timing Guide (Planning Estimates)
Hands-on prep: about 30–45 minutes total for milling, mixing, folds, pan preparation, transferring, and dimpling. This time is included in the prep estimate, not added to it.
Room-temperature schedule: 30–45 minutes to hydrate the flour; about 1½ hours for the initial 30-minute rest and three fold sets at 30-minute intervals; 2–5 hours for the first rise after the final fold; and 2–4 hours for the final rise the next day.
Prep outside the refrigerator: about 6½–12 hours, including hands-on work and the room-temperature rests and rises. Cold ferment: an additional 8–16 hours in the refrigerator, between the first rise and the next-day pan preparation. The refrigerator time is not included in prep time.
Total schedule: about 14½–28 hours before baking, or roughly 15¼–29 hours from starting to slicing with the 24–29-minute bake and at least 20 minutes of cooling. Allow longer if the dough needs more time or you prefer more cooling. Start with an active starter; feeding or building the starter is additional time.
Keep the dough covered during the final rise. If the surface dries, it can form a thin skin that cracks as the focaccia expands in the oven.
Fresh milled sourdough responds more reliably to visual signs than exact rising times. Watch the dough rather than waiting for it to double.
If your kitchen is warm or you are baking at high altitude, the dough may be ready sooner. Begin checking early to avoid overproofing.
For the best crust, remove the focaccia from the pan immediately after baking and cool it directly on a rack.
Storing & Freezing
Storing
Store completely cooled focaccia in an airtight container at room temperature for up to 2 days.
To refresh it, warm individual pieces in a 350°F oven for 5–8 minutes.
Freezing
For longer storage, wrap individual pieces tightly and freeze for up to 3 months. Thaw at room temperature, then warm in the oven until the edges are crisp.
Nutrition Information
About 24 servings per recipe · Serving size: 1 piece
Calories: 145
- Total fat: 4 g
- Saturated fat: 0.5 g
- Trans fat: 0 g
- Cholesterol: 0 mg
- Sodium: 345 mg
- Total carbohydrate: 25 g
- Dietary fiber: 4 g
- Total sugars: 0 g
- Added sugars: 0 g
- Protein: 5 g