Fresh Milled Baking 101
How to Shape Sandwich Bread and Bake a Better Loaf
A step-by-step beginner’s guide to shaping, proofing, baking, cooling, and troubleshooting soft sandwich loaves made with fresh milled flour.
by Eleen Beisner · Published
You’ve mixed the dough, let it rise, and now the recipe says “shape into a loaf.” If you’re wondering what that actually means, you’re in the right place.
A little shaping helps your bread rise evenly and gives you slices that hold together when you spread them with butter or pile on sandwich fillings. You don’t need fancy equipment. A clear counter, your hands, and a greased loaf pan will do.
This guide is for soft sandwich loaves, including those made with fresh milled flour. Follow your recipe for ingredients, rise targets, pan size, and baking temperature. Use these tips whenever you get to a step that needs a little more explanation.
Before You Start Shaping
Let the First Rise Finish
Shape after the dough has completed the first rise described in your recipe. It should look noticeably fuller and feel aerated. If the recipe says to let it double, look for that change instead of moving on just because the timer went off.
Use the Pan the Recipe Calls For
A 9 × 5-inch pan and an 8½ × 4½-inch pan don’t hold the same amount of dough. The same batch will sit lower in the larger pan, so don’t keep waiting for a tall dome that the dough may never make. Grease the bottom, sides, and corners before you begin.
Go Easy on the Flour
Start with a clean counter and a very light dusting of flour if needed. You can also use a thin wipe of oil for dough that sticks. Avoid a thick coating of either; the dough needs to stick to itself when you roll it.
Fresh milled dough can feel slightly tacky even when it’s ready. That little bit of stickiness isn’t a reason to keep adding flour. If the dough is smearing across the counter and won’t hold any shape, check whether it needs more kneading or the rest called for in the recipe before adding more flour.
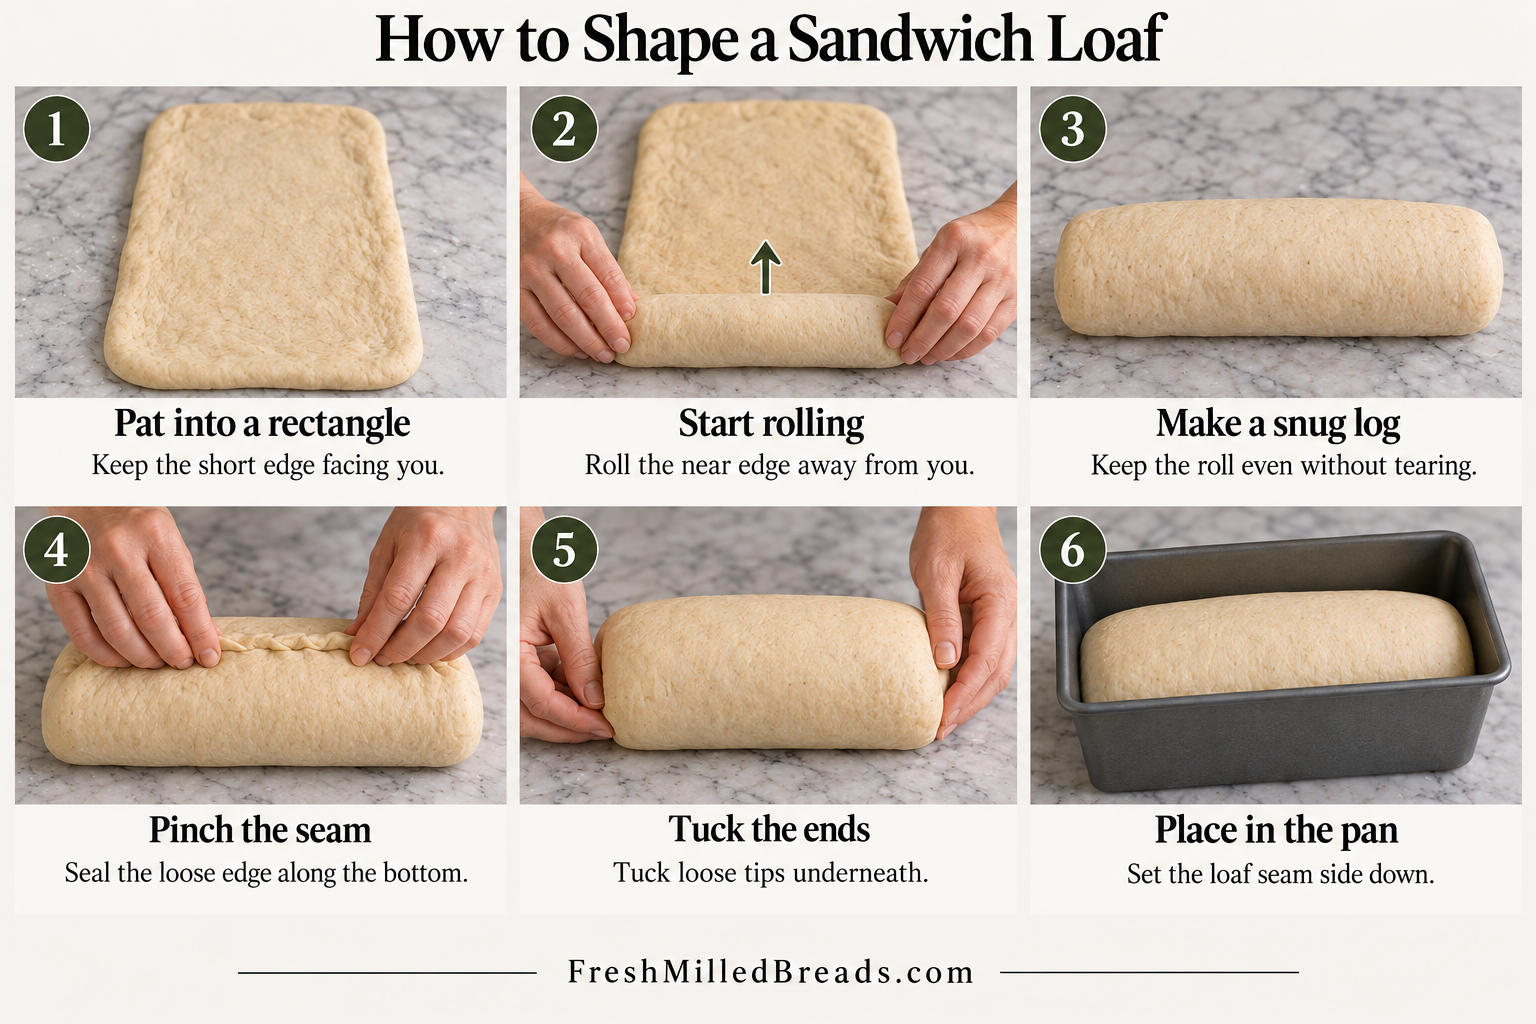
How to Shape a Sandwich Loaf
1. Gently Press Out the Dough
Turn the dough onto your counter and pat it into a rectangle, gently pressing out large air bubbles. Aim for an even thickness. For a 9-inch-long pan, make the short edge about 8 inches wide, with that edge facing you. The rectangle should extend away from you.
2. Start Rolling From the Edge Nearest You
Lift the short edge closest to you and roll it away from you. Press gently along the rolled edge so it meets the dough underneath without leaving a big air pocket.
3. Keep Rolling Into a Snug Log
Continue rolling away from you until you reach the far edge. Keep the roll snug, but don’t pull so hard that the surface tears. The finished log should be fairly even from end to end.
4. Pinch the Seam Closed
Pinch the loose edge to the log all the way along the seam. Brush away any loose flour first if the dough won’t stick.
5. Tuck in the Ends
Tuck any loose tips underneath and pinch them closed. Aim for a log slightly shorter than the inside of your pan. There’s no need to stretch it into every corner; it will expand as it rises.
6. Set It in the Pan
Place the dough seam side down, with the smooth side facing up. Cover it loosely with lightly greased plastic wrap or a roomy cover that won’t stick to the dough as it rises.
Give the Shaped Loaf Time to Rise
The rise after shaping is often called the final proof. This is when the dough fills out in the pan and starts looking like a loaf. Start preheating your oven before it reaches the recipe’s target so you’re ready when the dough is.
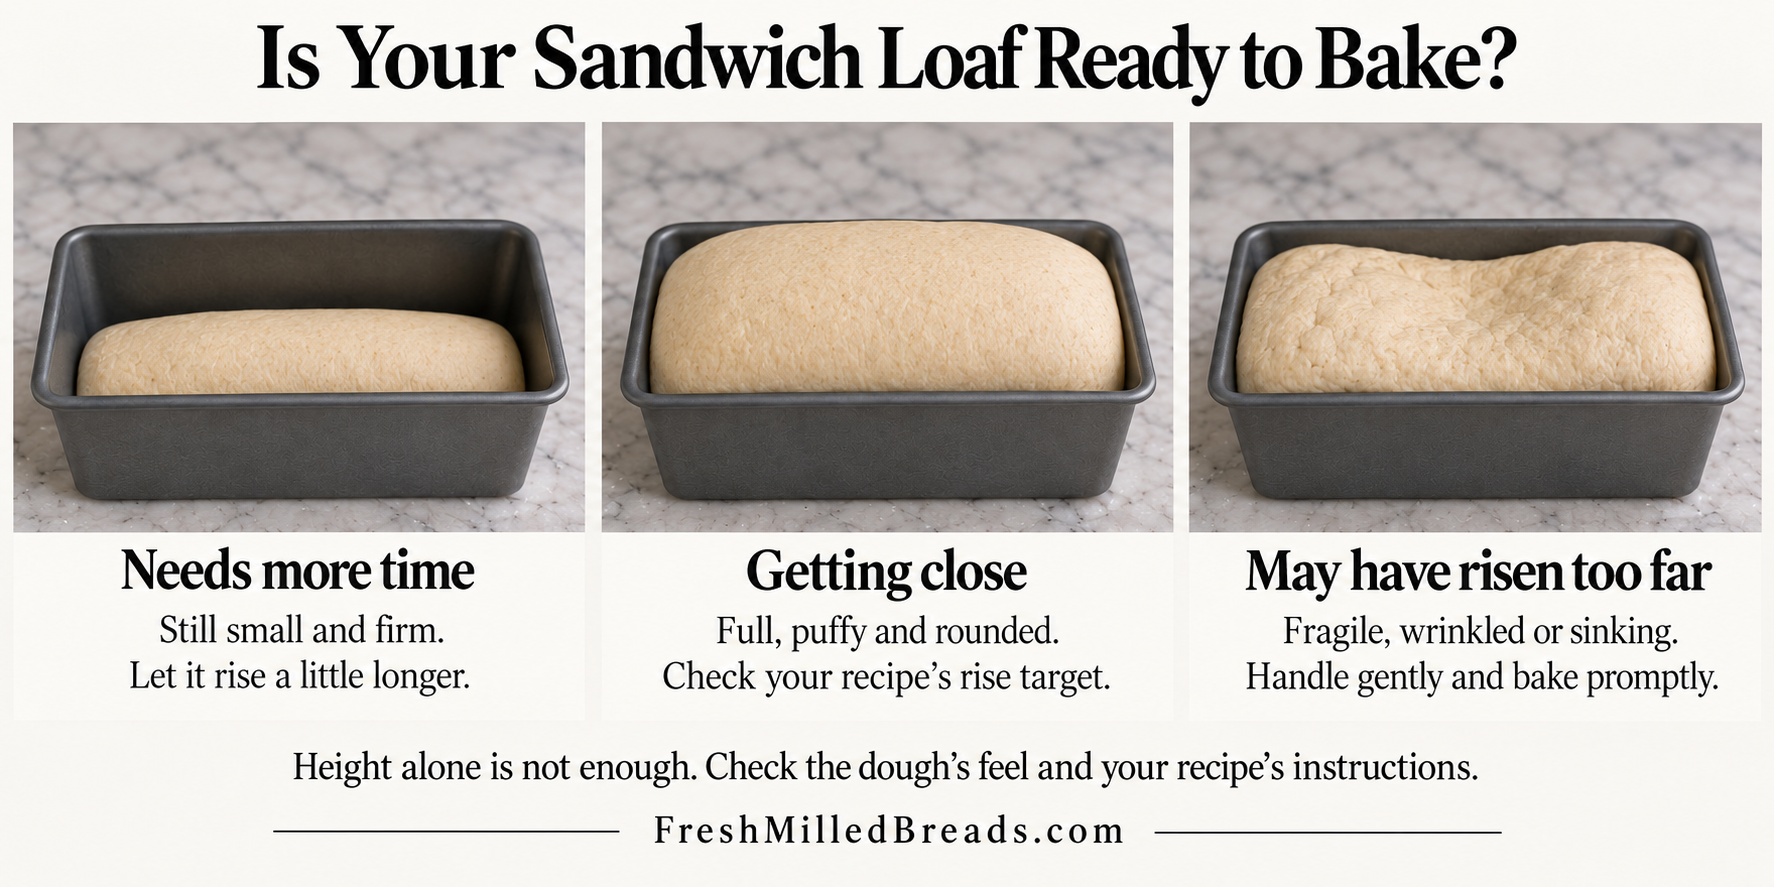
Look for a loaf that is fuller, rounded, and puffy. Some recipes call for the center to rise about an inch above the rim. That only makes sense when you’re using the intended amount of dough and the correct pan. Follow the target in your recipe.
Try a Gentle Touch
Lightly flour a fingertip and gently press a small dent into the dough near one end. If it springs back quickly and feels firm, it probably needs longer. If the dent returns slowly and leaves a slight impression, the loaf may be ready.
If the dough barely responds and looks fragile, wrinkled, or deflated, it may have gone too far. Bake promptly and handle it gently. The touch test is a clue, not a guarantee, especially with cold or very soft dough. Use it along with the loaf’s appearance and the recipe’s instructions.
Watch the Dough More Closely Than the Clock
A warm kitchen, warm dough, and the amount of yeast all affect how quickly bread rises. Fresh milled dough can move quickly, but it won’t always rise faster than every white-flour dough. Check it early, especially in a warm room or at higher altitude.
If Shaping Feels Awkward
If the rectangle keeps shrinking back, cover it and let it rest for 10 to 15 minutes, then try again. If you see a large bubble while rolling, press it out gently. If the surface tears, ease up on the pulling. A small tear can usually be pinched closed; you don’t need to start over.
A Few Habits That Make a Better Sandwich Loaf
Weigh the Flour and Give It Time to Absorb the Liquid
Fresh milled flour can settle differently from one scoop to the next. A kitchen scale makes the dough much more consistent. Whole grain flour also generally needs more water than white flour, and its feel changes as it rests. Give the recipe’s resting step time to work before deciding the dough needs adjusting.
Let the Dough Get Stretchy Before Its First Rise
Well-kneaded sandwich dough should become more cohesive and elastic. If it tears immediately when you gently stretch a small piece, it may need more kneading or a short rest. Fresh milled dough may not stretch into the same perfectly smooth, thin sheet as white-flour dough; don’t chase that result until the dough gets hot or starts breaking down.
Keep the Top From Drying Out
Cover the dough during both rises. A dry skin makes it harder for the loaf to expand neatly. Leave enough room under the cover for the dough to grow, and remove it gently before baking.
Check the Middle Before You Call It Done
A dark crust doesn’t always mean the center is baked, especially in dough with honey, milk, or eggs. If the top is browning too quickly, loosely tent it with foil and keep baking. Use your recipe’s doneness cues and internal temperature. Around 190°F is a useful benchmark for many soft sandwich loaves, though the recipe may specify otherwise.
Cool It Before Slicing
Remove the loaf from the pan once it’s firm enough to handle, following any cooling directions in the recipe, and set it on a rack. Let it cool completely before slicing, often a couple of hours for a full loaf. Cutting it hot can squash the soft middle and make the slices seem gummy. Use a serrated knife with a gentle sawing motion.
Freeze the Slices You Won’t Use Soon
Once the loaf is completely cool, store it airtight at room temperature for the next few days, or slice and freeze it. Separate the slices before freezing, or slip parchment between them, so you can take out just what you need. Avoid bagging warm bread; trapped steam leaves moisture inside the bag.
What Went Wrong With My Loaf?
There’s a Big Tunnel Through the Middle
A loose roll or trapped air can leave a tunnel. Next time, press out large bubbles, brush away loose flour, and keep the dough touching itself as you roll. A spiral gap can also happen when layers don’t seal together.
The Loaf Split Along the Side
It may have needed more time in the pan before baking, or the seam may not have been sealed. Check both next time. A dried-out surface can also contribute to tearing, so keep the loaf covered while it rises.
The Top Sank
Dough that rose too far can collapse, but underbaking or weak dough can also cause a sunken loaf. Think about when it sank. Was it already fragile before baking, or did it cave in while cooling? That helps you decide whether to adjust the rise, kneading, or bake.
The Bread Is Dry or Crumbly
Too much extra flour and baking longer than needed are two things to check first. Also make sure the dough was kneaded enough to become elastic and the loaf cooled before slicing. Adding more flour every time the dough feels tacky can leave you with a much drier loaf than the recipe intended.
The Loaf Is Short and Dense
Check the pan size before assuming the dough failed. If the pan was correct, the dough may have been too stiff, needed more kneading, or needed more time to rise. Shaping helps, but it can’t make up for dough that wasn’t ready beforehand.
Do I Need to Cut a Slit in the Top?
Usually, a soft sandwich loaf can go straight into the oven without a cut on top. If your recipe calls for scoring, follow that instruction.
Your first loaf doesn’t need a perfectly even dome. Start with soft, elastic dough, roll it snugly, pinch the seam, and give it the rise it needs. After a few loaves, you’ll recognize how the dough should feel without having to think through every step.
Recipes to Practice With
Use this shaping method with the Fresh Milled Rosemary Garlic Sandwich Bread. Follow the recipe for its own dough quantity, pan size, rise, and baking instructions.