Fresh Milled Baking 101
How to Shape Round Bread Rolls
A step-by-step beginner’s guide to dividing, shaping, proofing, baking, and troubleshooting round dinner rolls made with fresh milled flour.
by Eleen Beisner · Published
You’ve made the dough, let it rise, and now the recipe says “shape into balls.” Easy enough, until you have a sticky piece of dough in your hands and no idea how to make it look like a roll.
A few small movements make a big difference. Gathering the edges underneath and rounding the dough gives each roll a smooth top and helps it hold its shape as it rises. You don’t need to squeeze it into a perfect sphere or keep working it until every little wrinkle disappears.
This guide walks you through shaping round bread rolls, from soft dinner rolls and sandwich buns to crusty rolls and sourdough. Follow your recipe for the dough, portion size, pan, rising time, and baking method. The basic shaping is similar, but how you space, finish, and bake the rolls depends on what you’re making.
Before You Start Shaping
Let the First Rise Finish
Shape the rolls after the dough has completed the first rise described in your recipe. It should look fuller and feel aerated. If the recipe calls for doubling, look for that change instead of moving on just because the timer went off.
Have Your Pan Ready
Grease the pan or line the baking sheet as directed. The pan size matters: rolls crowded together will grow into one another sooner, while rolls in a larger pan have more room to spread. Use the pan and arrangement in your recipe rather than choosing a bigger one just because it’s handy.
Keep Most of the Flour Off the Counter
Start with a clean counter and add only a very light dusting of flour if needed. Rounding works best when the bottom of the dough has a little grip. If the counter is covered in flour, the ball can slide around without tightening.
Dough can feel slightly tacky and still be ready to shape, especially when made with fresh milled flour. Try a bench scraper and lightly floured hands before adding flour to the dough itself. A very thin wipe of oil can help with sticking if your recipe allows it, but too much will make the counter slippery.
How to Shape Round Rolls
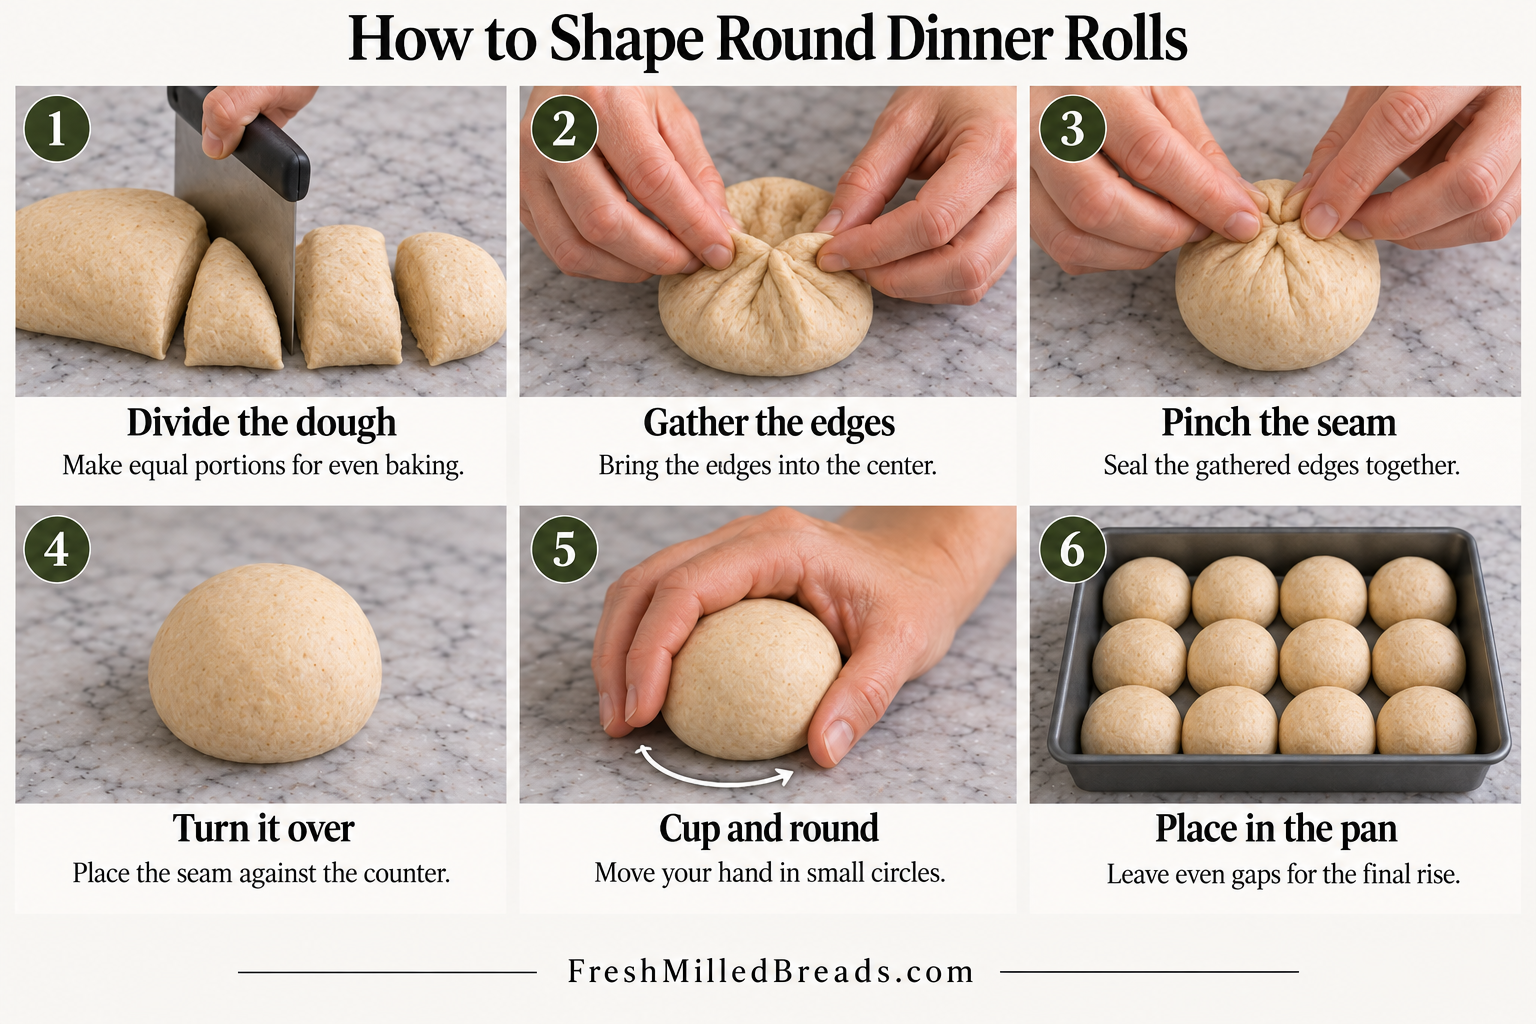
1. Divide the Dough Evenly
Turn the dough onto your counter and cut it into the number of pieces your recipe calls for. For even portions, weigh the whole batch and divide that weight by the number of rolls. For a fine, even crumb, gently press out large air bubbles. For airier rolls, handle the dough more gently and follow the recipe’s shaping directions. Keep the pieces covered while you work.
2. Gather the Edges Into the Center
Take one piece and gently ease it into a small, thick round without forcing it flat. Bring the edges into the center, working your way around like you’re closing a little pouch. If you have small scraps from adjusting the weight, tuck them inside now.
3. Pinch the Seam Closed
Pinch the gathered edges together so they stay closed. This puckered side will become the bottom of the roll. Brush away loose flour if it keeps the dough from sticking to itself.
4. Turn the Dough Seam Side Down
Flip the piece over so the seam rests against the counter and the smooth side faces up. It should already look roughly round.
5. Cup Your Hand and Make Small Circles
Curve your hand loosely around the dough, with your fingertips touching the counter. Move your hand in small circles, letting the bottom catch lightly against the surface. Stop when the ball looks smooth and holds its shape. Avoid pressing down or pulling the surface until it tears.
6. Place the Roll in the Pan or on the Baking Sheet
Set it seam side down in the prepared pan or on the baking sheet. Repeat with the remaining pieces, leaving even gaps as your recipe directs. Cover so the surface doesn’t dry out, leaving room for the rolls to rise. If you’re making sandwich buns, your recipe may ask you to gently flatten the balls at this point.
Give the Shaped Rolls Time to Rise
The rise after shaping is often called the final proof. This is when the rolls become fuller and lighter. Start preheating the oven before they reach the recipe’s target so the oven is ready when they are.
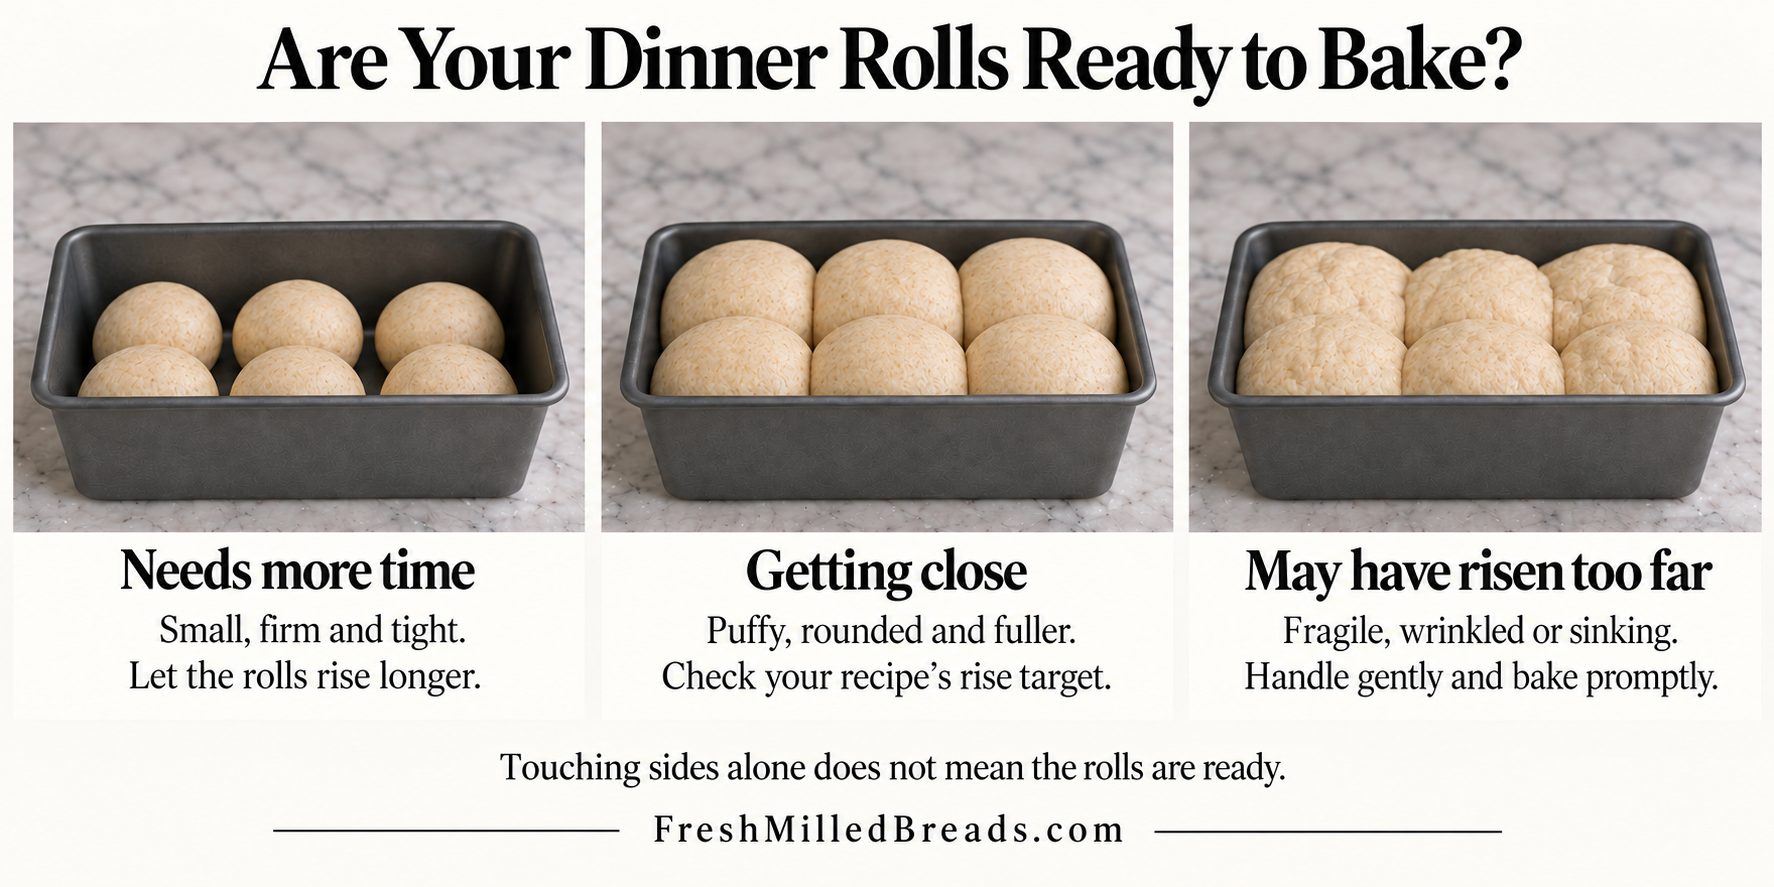
Look for rolls that have noticeably expanded and look puffy and rounded. In a pan of pull-apart rolls, the gaps will usually narrow or close. Touching sides alone doesn’t tell you they’re ready, though. Closely spaced rolls can touch long before they’ve risen enough.
Try a Gentle Touch
Lightly flour a fingertip and press a small, shallow dent into one roll. If it springs back quickly and feels firm, it probably needs more time. If the dent returns slowly and leaves a slight impression, the rolls may be ready.
If the dough barely responds and looks fragile, wrinkled, or deflated, it may have risen too far. Handle the pan gently and bake promptly. The touch test is a clue, not a guarantee, especially with cold or very soft dough. Use it alongside the recipe’s instructions and the way the rolls look.
Watch the Dough More Closely Than the Clock
Dough temperature, room temperature, and the amount of yeast or sourdough starter all affect the rise. Rich doughs with plenty of sugar and butter may take longer than simpler doughs. Fresh milled dough can also move quickly under warm conditions. Check it regularly rather than assuming every batch will follow the same schedule.
If Shaping Feels Awkward
If the dough resists stretching, cover it and let it rest for 10 to 15 minutes before trying again. If a ball skids around the counter, wipe away excess flour or oil. If the surface starts tearing, stop rounding. Pinch a small tear closed underneath if you can, then leave the roll alone.
A Few Tips for Better Rolls
Weigh the Flour and Give It Time to Absorb the Liquid
Flour can settle differently from one scoop to the next. A scale helps you start with the amount the recipe intended. Let the dough finish any resting step before deciding it needs more flour. This is especially helpful with fresh milled flour. Adding flour every time the dough feels tacky is an easy way to end up with dry rolls.
Follow the Recipe’s Kneading or Folding Steps
Most wheat roll doughs need enough kneading or folding to become stretchy and hold their shape. Some recipes build that strength gradually through rests and folds. Fresh milled dough may not stretch into the same perfectly smooth, thin sheet as white-flour dough. Follow your recipe rather than adding extra kneading just to chase that appearance. Very wet doughs, rye-heavy doughs, and gluten-free doughs may need a different shaping method.
Choose the Spacing for the Rolls You Want
For soft pull-apart rolls, use the recipe’s pan and spacing so the rolls can rise into one another. The tops stay rounded, but the sides won’t remain perfectly circular where they meet. That’s normal. For individual round rolls, leave enough room on a baking sheet for them to expand without touching. Spacing affects the shape and exposed crust, but a crisp crust also depends on the dough and baking method.
Follow the Recipe for Washes and Toppings
Some rolls get egg wash, milk, seeds, or butter; others go into the oven with nothing brushed on top. Follow your recipe, and brush fully risen rolls gently so you don’t press out the air. If the recipe calls for scoring, make those cuts just before baking. Sweet doughs and toppings can brown quickly. If the tops are darkening before the centers are done, loosely tent with foil and continue baking.
Check the Center as Well as the Crust
A browned top doesn’t always mean the center is baked. In a pan of touching rolls, check a middle roll because it may finish later than the edges. For separate rolls, check one of the largest. Follow your recipe’s baking time, crust cues, and internal temperature if one is given. Soft rolls and crusty rolls don’t necessarily finish at the same temperature or color. Keep the thermometer tip out of the pan and away from gaps between rolls.
Cool Them According to the Style of Roll
Let the rolls become sturdy enough to move, then transfer them to a rack as your recipe directs. Soft rolls can be served warm after a short rest. Crusty rolls benefit from cooling uncovered so steam can escape; wrapping or brushing them with butter will soften the crust. Allow the crumb to set before slicing rolls for sandwiches.
What Went Wrong With My Rolls?
They Spread Out Instead of Rising Upward
The dough may have been too loose, needed more kneading, or risen too far. A loosely shaped ball and a pan with lots of extra space can also let it spread. Start by checking the dough’s texture, then make sure you’re sealing the underside and gently rounding each piece.
The Tops Split or the Bottoms Opened
The rolls may have needed more rising time before baking, or the seams may not have been sealed. A dried-out surface can also tear as the dough expands. Keep the pieces covered while you shape, pinch the seams closed, and place them underneath.
They’re Dense Inside
Check whether the dough had enough time to rise both before and after shaping. Too much flour or too little kneading can also make dense rolls. Rolling a piece into a tighter ball won’t fix dough that was stiff or poorly developed to begin with.
They’re Dry Once They Cool
Extra flour and baking longer than needed are two things to check first. Small rolls can dry out quickly, especially when spread apart on a sheet. Check them near the beginning of the recipe’s baking range. A crisp crust is expected on some rolls, but the inside shouldn’t be unpleasantly dry.
Some Rolls Are Done and Others Aren’t
Uneven portions, uneven spacing, and hot spots in the oven can all contribute. Weighing the pieces helps. If one side of the pan consistently browns faster, rotate it once the rolls have set enough to handle the movement gently. Always check a center roll before taking out the pan.
Do the Dough Balls Have to Look Perfect?
No. Aim for a smooth top, a sealed underside, and similar sizes. A little wrinkle underneath is fine. If you keep reshaping a ball that already looks good, you’re more likely to tear the surface than improve it.
Storing and Freezing Round Rolls
Let the rolls cool completely before storing. Keep soft rolls in an airtight container or bag at room temperature for a few days, or freeze them for longer storage. Crusty rolls are best the day they’re baked; a paper bag helps preserve the crust briefly, but they’ll dry out faster. Freeze any you won’t eat soon. Rolls with perishable fillings need the storage instructions from their recipe.
Separate cooled rolls before freezing so you can take out just a few at a time. Thaw soft rolls while wrapped and warm gently in foil if you like. Reheat crusty rolls uncovered to help crisp the outside again. Follow your recipe for reheating times and any finishing butter. Avoid bagging hot rolls; trapped steam leaves moisture inside the bag.
Recipes to Practice With
Put this technique into practice with Fresh Milled Honey Butter Rolls. Follow the recipe’s directions for portion size, pan arrangement, proofing, and baking.